This isn't strictly a guide to removing the head- its a documentation of what I did having found myself in the position of unexpectedly having to remove the head whilst I was half way through an oil pump strip. I had accidentally removed the camshaft and so now had to remove the head to reinstall the valve gear and reset its timing. Obviously if your not trying to get at the oil pump you dont need to do anything under the right hand cover!- just remove the carb and exhaust.
In my case I needed to remove the now loosely floating cam followers from beneath marking them as inletc and exhaust. The push rods can't be removed downwards though and have to wait until the head has been raised.
 |
| Removing the cam followers |
The pushrod can rest on the distributor drive shaft pinion until then.
 |
| Pushrods then slip down onto the timing pinion. |
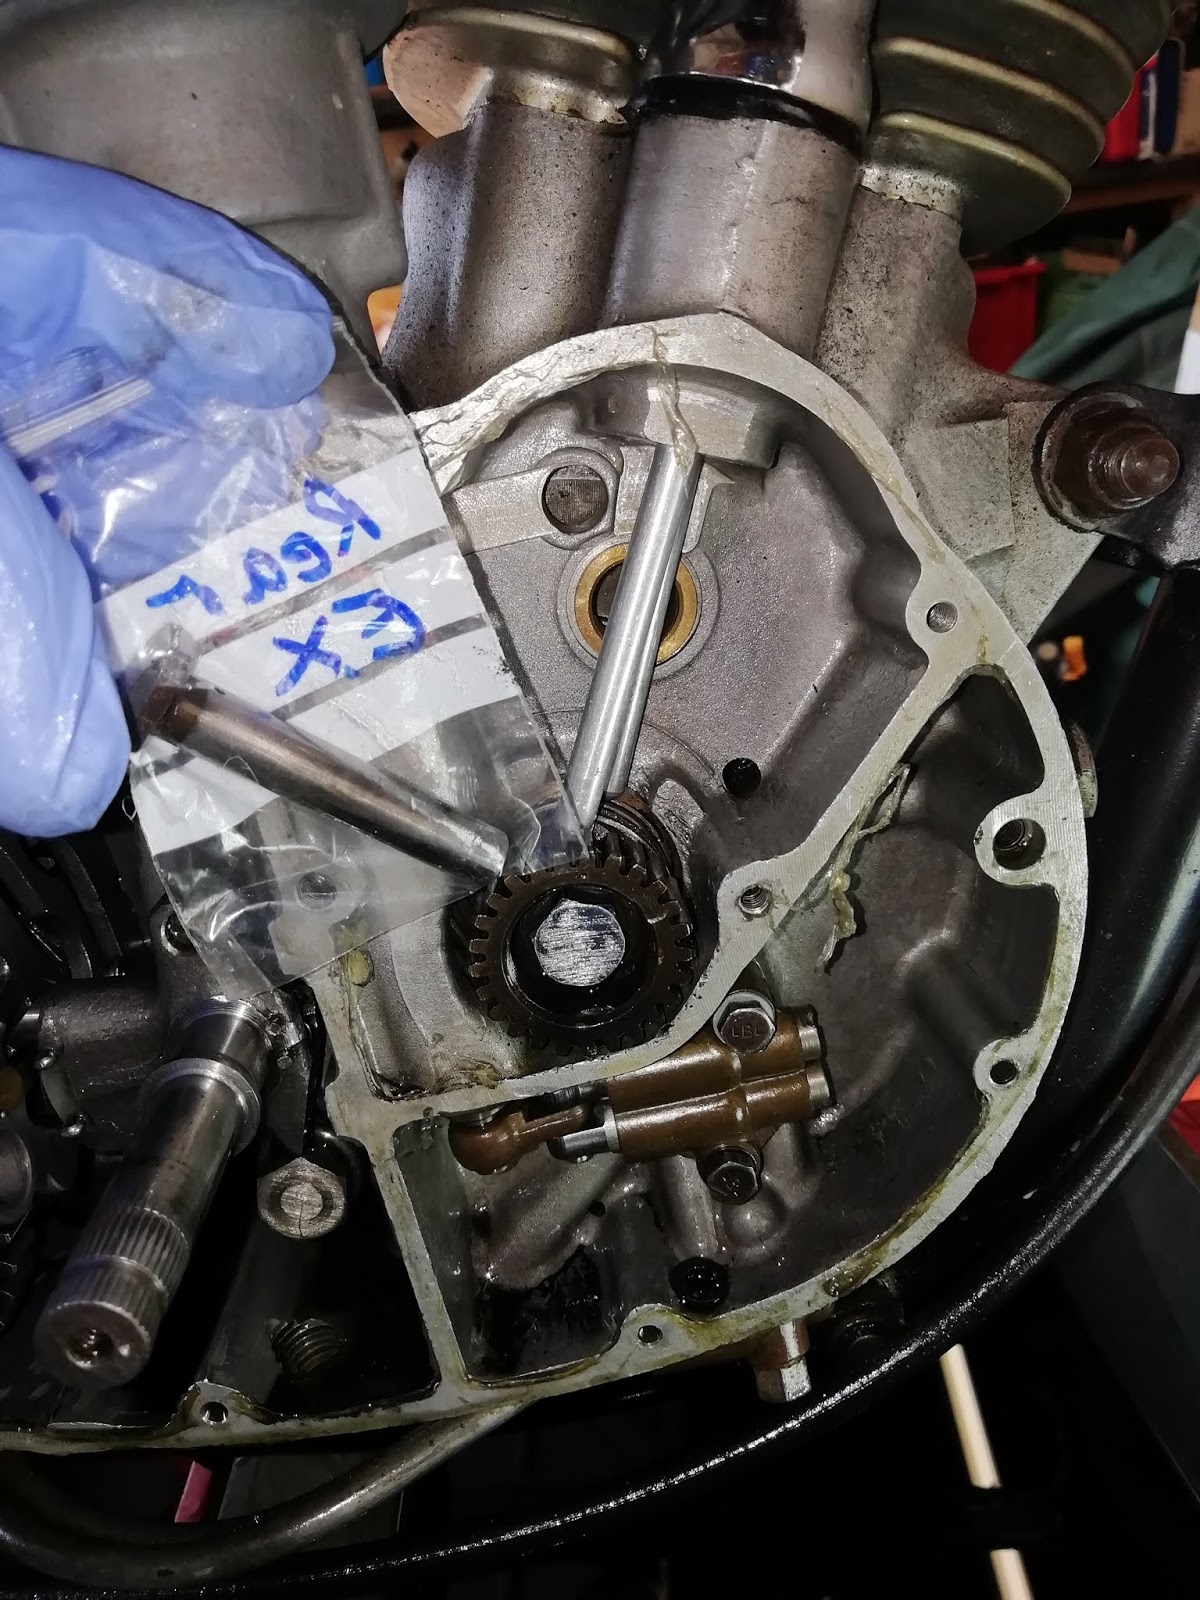
In order to set the timing I'm going to need to turn the motor and so I need to secure the distributor clamp to prevent the timing from slipping. The actual bolt is long enough to penetrate both cases so I cobbled together two small sockets and a washer to take up this extra length.
 |
| Sockets as spacers on the distributor clamp bolt |
Once installed this tightened up the distributor clamp.
 |
| Distributor clamped. |
 |
| second view. |
Removing the head needs removal of the exhaust and carburettor but these were already off in my case. Consequently all I needed to do was detach the rocker oil feed pipe. two domed nuts with 2 copper sealing washers beneath each and sandwiching the supply pipe.
 |
| Loosening the oil supply feed to the rockers. |
 |
| Removing the oil feed note copper sealing washers beneath. |
Remove the tappet cover nuts and covers to give a bit more room. Note these nuts also have a copper washer beneath. If your covers arent finned you might have enough room anyway.
 |
| tappet cover nuts and washer off. |
On checking it does seem that the pushrod tube oil seals look in poor condition, the top one has split.
 |
| Pushrod- seal seems to be split or displaced at the top. |
 |
| Loosening the head nuts |
Finally I loosened the head nuts diagonally. Those on the lhs are easily accessed using a socket, but those on the right are more awkward. I found a flat ring was fine.
 |
| Access is awkward- flat ring solved it. |
The head can then be raised, but I had to remove the rocker cover, especially if finned as here to give more room beneath the frame.
 |
| Easing the head up |
As soon as its free, pull the pushrod tube out of its head recess or it will prevent the head rising. You can remove the pushrods at this stage. The rear one serves the exhaust valve and the front the inlet. I painted the top of the exhaust rod to identify it
 |
| Removing the push rods. I used a magnet to grab them. |
Remove push rod tube
Raise the head and tilt it forwards to remove it to the lhs of the frame.
The remnants of the lower push rod tube seal show that this too was in poor condition.
Piston crown was a bit carbonised so I cleaned it off. No marks here so I think it's a replacement std piston and barrel
 |
| Piston crown a bit carbonised, raised to tdc. |
It's possible to turn the motor over by turning the distributor drive pinion. Raise the piston to tdc and identify the compression stroke by the points being open. You can then reinsert the cam followers and slip the camshaft back in to support them. Mesh the camshaft gear with the timing pinion ensuring that the dot between two teeth on the camshaft gear engages with the dot on one tooth of the timing pinion.
 |
| Check the points are open so its tdc on compression, and then reissert the camshaft aligning the dot on one tooth with the indication between teeth on the cam shaft gear. |
 |
| push rod tube location cleaned. |
You can then clean the push rod mating surfaces and fit new seals to the rod. Silicone upper, rubber lower. I found my push rod ends were a bit bent and corroded so I had to try and restore the shape at the lower end as well as ensuring the groove could accept the seal all round.
 |
| Rubber seal on push rod tube LOWER end. |
 |
| Silicone seal on push rod tube UPPER end. |
Refitting The push rods and their tube is blooomin' awkward. You need to slip the push rods down their tube and ensure that their ends engage with the cam followers. Then position the push rod tube beside the barrel and head and use your remaining third hand to lower the head whilst ensuring the push rod tops engage with the ball ends in the relevant rockers. You can't see this and the process is done largely by guesswork. I'm told it can be easier if you use a rubber band to hold the push rod tube against the barrel thus freeing up one hand, and make a thin paper template to hold the rod tops apart as you lower the head onto them. There's no way to tell if it's right without turning the motor or taking it all apart again. I assembled and disassembled the rods and head three times before I was confident and then I screwed the head nuts down to hand tight plus a half turn before I could try to turn the motor. Unfortunately now the timing gear is reinstalled turning the motor also compresses the valve springs and this resistance means I couldn't use the distributor pinion as before, I had to use the kick-start. Obviously this is no problem unless you've got the side of the motor off as I had! I was able to conform that the exhaust operated first after the tdc compression position in which the motor was set. Unfortunately I couldn't check the operation of the inlet as the gearbox went clunk and jammed so now I will need to sort that out too!
I think the problem is that its difficult to use the gearbox when the quadrant is unsupported. Its necessary to refit the inner plate in order to realign the gear change lever, quadrant and gearbox shafts. As long as the lever plungers are engaged in the quadrant, and the gear change forks in their groove on the two shafts, then this will give correct alignment and a gear. You will need to move the gear change to align the quadrant but the cover does go back on. I refitted the distributor clamp screw adapting the sockets so that it could still be tightened up and I could then turn the motor over and verified that both rockers were working.
 |
| Clamp screw in position with both covers removed. I used a socket to allow the screw to tighten on the clamp before trying to turn the motor over. |
Its then a case of tightening the head nuts down and refitting the ancillaries already removed. In my case I could get back to sorting out my oil pump!


No comments:
Post a Comment
Please feel free to make suggestions or improvements